Sous vide is one of the easiest ways to get restaurant-level consistency at home—especially for steak, chicken, and salmon. The “secret” isn’t fancy gear. It’s three things: accurate temperature, enough time, and safe handling.
This guide is written for normal home cooking: simple setup, realistic time/temperature charts, and the food-safety basics people skip.
What sous vide actually does (in plain English)
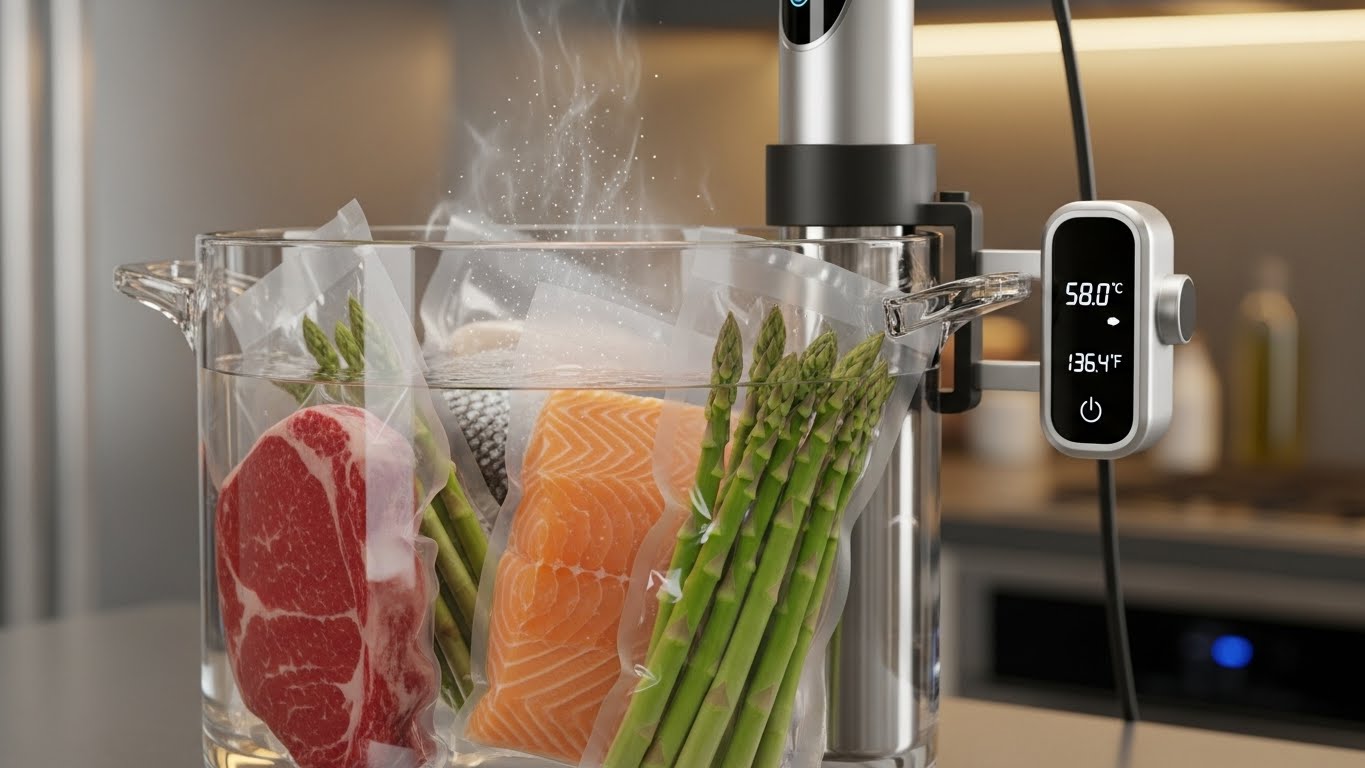
Sous vide means cooking food sealed in a bag in a water bath held at a precise temperature. Because the water never goes above your set temp, you can’t “accidentally” overcook the inside the way you can in a pan or oven.
You finish most foods with a quick sear (for color and flavor).
What you need (minimal)
- Sous vide immersion circulator (the stick)
- A pot or heat-safe container
- A way to hold the bag down (clip, rack, spoon, or a weight)
- Zip-top bag or vacuum-seal bag
- Tongs + paper towels (important for searing)
Optional but nice:
- Cast-iron skillet or ripping-hot pan for searing
- Instant-read thermometer (helpful but not required)
Step-by-step: the beginner-proof method
1) Preheat the water bath
Fill a pot/container with water, attach the sous vide cooker, and set your target temp.
Pro tip: hot tap water speeds things up.
2) Season the food (keep it simple)
Salt + pepper is enough. You can add garlic, herbs, or a little butter—but go easy. Sous vide intensifies flavors.
Avoid: too much raw garlic in the bag for long cooks (it can taste harsh). If you love garlic flavor, use garlic powder or sear with garlic at the end.
3) Bag it correctly (no leaks, no floating)
Zip-top bag method (water displacement):
- Put food in the bag.
- Lower the bag into water slowly so water pressure pushes air out.
- Seal the top right before it’s fully submerged.
Vacuum seal method:
- Seal the bag with a proper vacuum sealer.
- Double-seal if you’re cooking something liquid-y (marinades).
4) Keep it fully submerged
The food must stay under water the whole time. If the bag floats:
- Add a sous vide weight or a butter knife (inside the bag)
- Clip it to the side of the container
- Use a rack to separate multiple bags
5) Cook for the recommended time
Time depends on thickness and what you’re cooking. Don’t stress about being exact—sous vide is forgiving within a range.
6) Dry thoroughly, then sear fast
This is where people mess up.
- Remove food from bag.
- Pat completely dry with paper towels (this matters).
- Sear in a very hot pan with a small amount of oil.
- Aim for 30–60 seconds per side for steak/chops.
- For chicken, 60–90 seconds per side is common.
You’re not “cooking” here—you’re adding crust and flavor.
Time & Temperature Charts (Home-Friendly)
These ranges are meant for typical thickness (about 1–2 inches for meats). If your cut is thicker, use the longer time.
Steak (ribeye, strip, filet)
Doneness
- Rare: 129°F / 54°C — 1 to 2.5 hours
- Medium-rare: 134°F / 57°C — 1 to 3 hours
- Medium: 140°F / 60°C — 1 to 3.5 hours
- Medium-well: 149°F / 65°C — 1 to 3.5 hours
Notes
- Thicker steaks (2″+): lean toward 2–4 hours.
- If you go very long, texture can start to turn “too tender” or slightly mushy.
Chicken breast (boneless)
- Juicy/tender: 145°F / 63°C — 1.5 to 2.5 hours
- More traditional/firm: 150°F / 66°C — 1 to 2.5 hours
- Very firm (like fully cooked roast chicken feel): 160°F / 71°C — 1 to 2 hours
Note: Chicken at 145°F can be safe if held long enough (more on safety below), but texture surprises people at first—very juicy.
Chicken thighs (boneless/skin-on)
- Sliceable but tender: 165°F / 74°C — 1.5 to 4 hours
- Fall-apart tender: 170–176°F / 77–80°C — 3 to 6 hours
Pork chops
- Juicy, slightly blush: 140°F / 60°C — 1 to 3 hours
- More traditional: 145°F / 63°C — 1 to 3 hours
- Firmer: 150°F / 66°C — 1 to 3 hours
Salmon
- Silky / “buttery”: 120°F / 49°C — 30 to 45 minutes
- Flaky but moist: 125–130°F / 52–54°C — 30 to 60 minutes
Tip: Salmon is best on the shorter end. Too long can soften it too much.
Eggs (shell-on)
- Soft/poached-style: 145°F / 63°C — 45 minutes
- Jammy yolk: 147–149°F / 64–65°C — 45–60 minutes
- Custardy set: 167°F / 75°C — 12–15 minutes
Vegetables (need higher heat than meat!)
- Carrots: 183°F / 84°C — 1 to 2.5 hours
- Potatoes: 194°F / 90°C — 1.5 to 3 hours
- Asparagus: 180°F / 82°C — 10 to 20 minutes
Food Safety Basics (the part that keeps you out of trouble)
Sous vide is safe when you respect temperature + time and avoid leaving food in the danger zone.
The danger zone (simple rule)
Bacteria multiply fastest between 40°F and 140°F (4°C–60°C).
Golden rules:
- Don’t leave raw meat sitting out while you prep.
- Preheat your water bath so food heats up quickly.
- Keep everything fully submerged.
About “pasteurization” (why lower temps can still be safe)
Food safety isn’t only “hit 165°F instantly.” It can also be “hold a lower temp long enough to reduce bacteria.”
That’s why chicken can be safe and juicy at 145°F if it stays there for the proper time.
Practical beginner guideline:
If you’re new and want to keep it simple, use:
- Chicken breast: 150°F
- Chicken thighs: 165°F
You’ll still get great texture without overthinking pasteurization charts.
Don’t sous vide frozen food in a hurry
You can cook from frozen, but add time and make sure it reaches target temp. If you’re unsure, thaw first.
When to chill and store (meal prep)
If you’re not eating immediately:
- Keep food in the sealed bag.
- Chill quickly in an ice bath (half ice, half water) for 20–30 minutes.
- Refrigerate.
This prevents the food from spending too long warm.
Reheating:
Reheat in sous vide at 10–15°F below your original cook temp until warmed through, then sear if needed.
Common mistakes (and how to fix them)
1) “My steak didn’t brown”
You didn’t dry it enough or the pan wasn’t hot enough.
Fix: Pat dry thoroughly + preheat pan until very hot.
2) “The bag floated”
Air trapped inside.
Fix: Use water displacement method carefully, or add a small weight.
3) “It tastes bland”
Sous vide needs seasoning.
Fix: Salt properly, or finish with a sauce. Also sear hard for flavor.
4) “Texture is mushy”
You cooked too long at a low temp (common with fish).
Fix: Shorten time, especially for seafood; use recommended ranges.
5) “Too much liquid in the bag”
Some purge is normal (especially meat).
Fix: Don’t use that liquid straight. Reduce it into a pan sauce if you want.
Quick “best settings” starter pack (if you don’t want to think)
- Steak (medium-rare): 134°F / 57°C for 1.5–2 hours, quick sear
- Chicken breast: 150°F / 66°C for 1.5–2 hours, quick sear
- Pork chops: 145°F / 63°C for 1.5–2.5 hours, quick sear
- Salmon: 125°F / 52°C for 35–45 minutes (no long hold)